Dynamic GitHub Profile
Dynamic GitHub Profile
If you are only interested in the full code, jump to the Full dynamic README generation template and Automatic README generation GitHub action workflow sections after creating the profile repository in Make the profile README repository
Table of Contents
- Dynamic GitHub Profile
- What is a GitHub profile README
- How to make a dynamic profile README
- Full dynamic README generation template
- Automatic README generation GitHub action workflow
What is a GitHub profile README
A public-facing GitHub profile is one of the best ways to show a portfolio of code. Anyone interested in hiring or collaborating can see immediately what kinds of projects you have worked on and dive into your code to see good coding habits and well-written documentation.
The first place they will land when they navigate to your GitHub page is your profile. There, they can immediately see a few things by default:
-
Your profile picture and bio
This is a great place to show a professional headshot, a brief bio, and link to a portfolio website, blog, socials (LinkedIn).

-
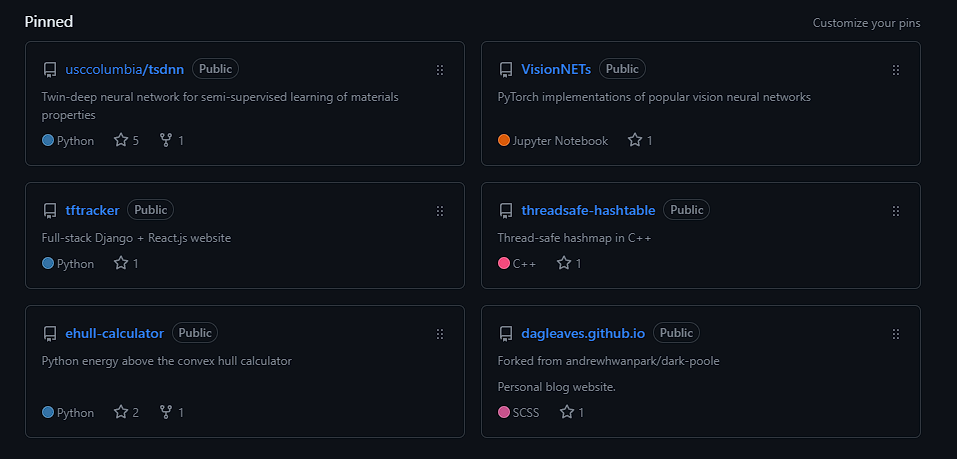
Your pinned repositories
If there are projects that you have made signifcant contributions to that you want to prioritize, they should be pinned
-
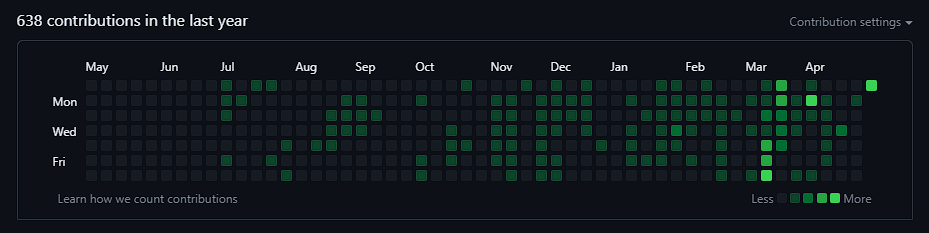
Contribution Activity
Unless you are employed and working on private codebases, it is good to show that you are actively working on projects and actively learning. Your commits, issues, pull requests, and other publicly tracked contributions will be shown here.
-
Profile README
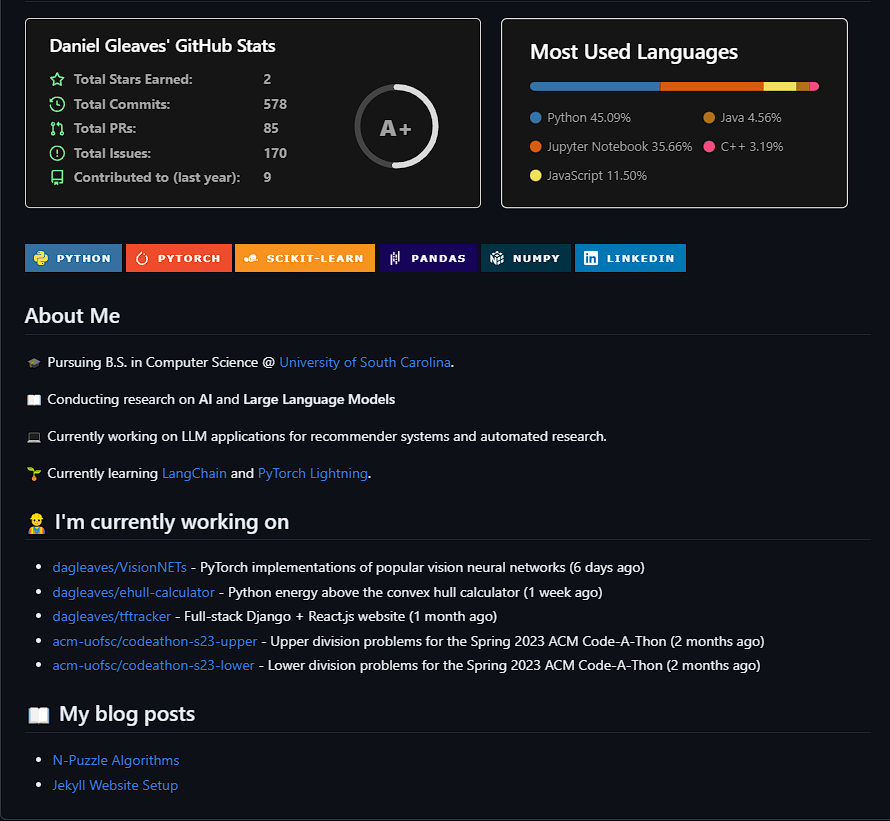
- Not everyone knows that you are able to have a profile README file that shows at the top of your GitHub profile page. This is a great way to stand out to anyone coming to your profile and provides an extra opportunity to show off projects you are proud of and your key skills.
- Mine here is dynamically updated to display my current GitHub statistics, recent repo activity, and recent blog posts from GitHub pages.
How to make a dynamic profile README
Make the profile README repository
The first step is to make the GitHub profile repository that will house the README.md file and our GitHub actions.
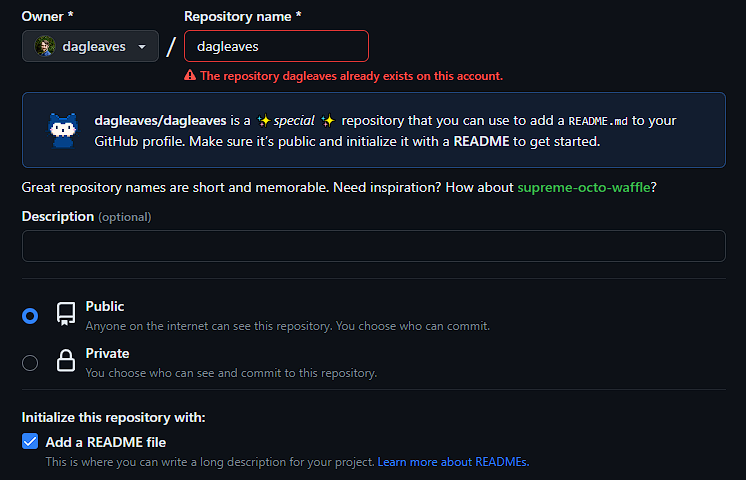
- Click the New button to create a new repository.
- Enter your GitHub profile name as the name of the repository
- You will see a special message confirming that this is for the profile README
- Make sure the repo is set to
Public - Check the
Add a README filecheckbox - Create the repo
Now it is ready to integrate the widgets, badges, and GitHub Actions.
Header + Emojis
My header is very simple:
# Hi there, I'm Daniel! :wave:
Adding emojis to the markdown file is very easy. You can either copy and paste the emoji or use the shortcode. A cheatsheet of emojis and shortcodes that can be used with GitHub can be found here.
Profile Widgets
I use the GitHub Readme Stats widgets for my profile stats and top languages. Check out their repo for their full array of widgets and customization options.
You can copy the code directly from them, or use my setup.
I embed the widget in an HTML <img> tag in order to customize the alignment and width to ensure the two widgets line up correctly.
GitHub Statistics Widget
- Total Stars Earned
- Total Commits
- Total PRs
- Total Issues
- Projects Contributed To
WARNING: With the number of people that use this widget, it does sometimes get rate-limited and will be down for an hour. If you want to avoid this, you can self-host your own instance of the app by following the instructions in this post.
Widget Code
<img align="left" width="54%" src="https://github-readme-stats.vercel.app/api?username=dagleaves&theme=dark&include_all_commits=true&count_private=true&show_icons=true" />
Make sure to replace the username flag with your username. I use the dark theme, but there are many available themes. I also choose to display all commits, including private ones, instead of just data from the current year.
Widget Appearance
Top Languages Widget
This widgets displays the percentages of your most commonly used languages across your repos.
Widget Code
<img align="left" width="41%" src="https://github-readme-stats.vercel.app/api/top-langs/?username=dagleaves&layout=compact&theme=dark&include_all_commits=true&count_private=true" />
Widget Appearance
Badges
Badges are a great way to add a pleasing visual showing off technologies you are familiar with. There are hundreds of available badges. You can find a list of badges here.
Badges Code


<a href="https://www.linkedin.com/in/dagleaves/"><img src="https://img.shields.io/badge/linkedin-%230077B5.svg?style=for-the-badge&logo=linkedin&logoColor=white"/></a>
If you want to turn them into clickable links, as I did for my LinkedIn profile, simply use the link as the src attribute in an <img> element and wrap it in an
<a> anchor element. Set the href attribute to where you want it to redirect to.
Badges Appearance
![]()
![]()
![]()
![]()
![]()
Dynamic GitHub + Blog Activity Tracking
The two sections of my profile README that I like the most are the activity tracking. The README gets automatically updated with my most recent GitHub contributions and my most recent blog posts using GitHub actions.
The way I accomplish this is by using the readme-scribe GitHub action. This will automatically generate a README based on a provided markscribe template, which allows us to dyamically-updated content, such as RSS feeds and all kinds of GitHub activity tracking. You can see the full list of available tracking in the markdownify link above.
GitHub Pages RSS Tracking
In order to track the entries from this blog, which is hosted by GitHub pages with Jekyll, I use the automatically generated atom.xml feed. This can be found at https://dagleaves.github.io/atom.xml.
## :book: My blog posts
{{range rss "https://dagleaves.com/atom.xml" 5}}
- [{{.Title}}]({{.URL}})
{{- end}}
GitHub Contributions Tracking
Tracking GitHub contributions is handled entirely by markscribe by providing a personal access token to the readme-scribe action.
## 👷 I'm currently working on
{{range recentContributions 5}}
- [{{.Repo.Name}}]({{.Repo.URL}}) - {{.Repo.Description}} ({{humanize .OccurredAt}})
{{- end}}
You can adjust the number of contributions shown by changing the 5 in the top range field. This shows the names, descriptions, and last contribution time for each of my 5 most recent public GitHub contributions.
Full dynamic README generation template
The final two pieces are the full template and the GitHub action workflow file.
- Clone your profile README repo:
git clone https://github.com/username/username.git cd username - Make a templates folder (optional):
mkdir templates cd templates - Create the README template file:
touch README.md.tpl - Enter the full template code:
# Hi there, I'm Daniel! :wave:
<img align="left" width="54%" src="https://github-readme-stats.vercel.app/api?username=dagleaves&theme=dark&include_all_commits=true&count_private=true&show_icons=true" />
<img align="left" width="41%" src="https://github-readme-stats.vercel.app/api/top-langs/?username=dagleaves&layout=compact&theme=dark&include_all_commits=true&count_private=true" />
<br/><br/>
<br/><br/>
<br/><br/>
<br/><br/>
<br/><br/>


<a href="https://www.linkedin.com/in/dagleaves/"><img src="https://img.shields.io/badge/linkedin-%230077B5.svg?style=for-the-badge&logo=linkedin&logoColor=white"/></a>
## About Me
🎓 Pursuing B.S. in Computer Science @ [University of South Carolina](https://sc.edu/study/majors_and_degrees/computer_science_computer_engineering.php).
📖 Conducting research on **AI** and **Large Language Models**
💻 Currently working on LLM applications for recommender systems and automated research.
:seedling: Currently learning [LangChain](https://github.com/hwchase17/langchain) and [PyTorch Lightning](https://github.com/Lightning-AI/lightning).
## 👷 I'm currently working on
{{range recentContributions 5}}
- [{{.Repo.Name}}]({{.Repo.URL}}) - {{.Repo.Description}} ({{humanize .OccurredAt}})
{{- end}}
## :book: My blog posts
{{range rss "https://dagleaves.com/atom.xml" 5}}
- [{{.Title}}]({{.URL}})
{{- end}}
Automatic README generation GitHub action workflow
The final remaining piece is to use the readme-scribe GitHub action to automatically update the profile README every hour.
- In the base repo directory, create the .github/workflows folder.
mkdir .github
mkdir .github/workflows
- Create the
readme-scribe.ymlworkflow file
name: Update generated README
on:
    schedule:
        - cron: "0 */1 * * *"
    workflow_dispatch:
permissions:
    contents: write


jobs:
    markscribe:
        runs-on: ubuntu-latest
        steps:
            - uses: actions/checkout@master

            - uses: muesli/readme-scribe@master
                env:
                    GITHUB_TOKEN: ${{ secrets.PERSONAL_GITHUB_TOKEN }}
                with:
                    template: "templates/README.md.tpl"
                    writeTo: "README.md"

            - uses: actions/upload-artifact@v1
                with:
                    name: README.md
                    path: README.md

            - uses: stefanzweifel/git-auto-commit-action@v4
                env:
                    GITHUB_TOKEN: ${{ secrets.GITHUB_TOKEN }}
                with:
                    commit_message: Update generated README
                    branch: main
                    commit_user_name: readme-scribe 🤖
                    commit_user_email: actions@github.com
                    commit_author: readme-scribe 🤖 <actions@github.com>
Two important notes:
- Make sure your branch name matches at the bottom of the file. I use the
mainbranch. This is the branch that it will look at for the template and where it will generate the README file. - You must provide a personal access token to the action named
PERSONAL_GITHUB_TOKENin order for it to work.
This will have GitHub run the action every hour to fetch the latest data and generate a new README file.
Add personal access token to action
IMPORTANT: Do NOT paste a personal access token plainly into an action workflow file. Always use GitHub’s secret system to ensure your token is kept encrypted and safe.
- Generate a new token
- This can be found by going to settings > Developer Settings > Personal Access Tokens or by this link.
- Click generate a new token and give it the necessary permissions (per the readme-scribe documentation)
read:userrepo:statuspublic_reporead:org
- Copy the generated token
- Go to the profile repo’s action secrets page
- Repo > Settings > Secrets and variables > Actions or https://github.com/username/username/settings/secrets/actions
- Click
New repository secret - Name it
PERSONAL_GITHUB_TOKEN - Paste the generated token
- Add secret
That’s it! You can test the action by manually triggering it in the Actions tab and check to make sure your profile README.md file looks correct.